On this page
Build a Nuxt app with Deno
Nuxt is a framework that provides an intuitive way to create full-stack applications based on Vue. It offers file-based routing, a variety of rendering options, and automatic code splitting out of the box. With its modular architecture, Nuxt simplifies the development process by providing a structured approach to building Vue applications.
In this tutorial, we'll build a simple Nuxt application with Deno that will display a list of dinosaurs and allow you to learn more about each one when you click on the name:
You can find the code for this project in this repo.
Scaffold a Nuxt app with Deno Jump to heading
We can create a new Nuxt project using Deno like this:
deno -A npm:nuxi@latest init
We'll use Deno to manage our package dependencies, and can grab the Nuxt package from npm. This will create a nuxt-app with this project structure:
NUXT-APP/
├── .nuxt/                   # Nuxt build directory
├── node_modules/           # Node.js dependencies
├── public/                 # Static files
│   ├── favicon.ico
│   └── robots.txt
├── server/                # Server-side code
│   └── tsconfig.json
├── .gitignore
├── app.vue               # Root Vue component
├── nuxt.config.ts        # Nuxt configuration
├── package-lock.json     # NPM lock file
├── package.json          # Project manifest
├── README.md
└── tsconfig.json        # TypeScript configuration
Setup server API routes Jump to heading
Let’s first start by creating the API routes that serve the dinosaur data.
First, our
dinosaur data
will live within the server directory as server/api/data.json:
[
  {
    "name": "Aardonyx",
    "description": "An early stage in the evolution of sauropods."
  },
  {
    "name": "Abelisaurus",
    "description": "\"Abel's lizard\" has been reconstructed from a single skull."
  },
  {
    "name": "Abrictosaurus",
    "description": "An early relative of Heterodontosaurus."
  },
  ...etc
]
This is where our data will be pulled from. In a full application, this data would come from a database.
⚠️️ In this tutorial we hard code the data. But you can connect to a variety of databases and even use ORMs like Prisma with Deno.
This app will have two API routes. They will serve the following:
- the full list of dinosaurs for an index page
- individual dinosaur information for an individual dinosaur page
Both will be *.get.ts files, which Nuxt automatically converts to API
endpoints to respond to GET requests.
The filename convention determines both the HTTP method and the route path.
The initial dinosaurs.get.ts is fairly simple and uses
defineCachedEventHandler to create a cached
endpoint for better performance. This handler simply returns our full dinosaur
data array without any filtering:
import data from "./data.json" with { type: "json" };

export default defineCachedEventHandler(() => {
  return data;
});
The GET route for the individual dinosaur has a little more logic. It extracts
the name parameter from the event context, performs case-insensitive matching to
find the requested dinosaur, and includes proper error handling for missing or
invalid dinosaur names. We'll create a dinosaurs directory, then to pass the
name parameter, we'll make a new file named [name].get.ts:
import data from "../data.json";

export default defineCachedEventHandler((event) => {
  const name = getRouterParam(event, "name");

  if (!name) {
    throw createError({
      statusCode: 400,
      message: "No dinosaur name provided",
    });
  }

  const dinosaur = data.find(
    (dino) => dino.name.toLowerCase() === name.toLowerCase(),
  );

  if (!dinosaur) {
    throw createError({
      statusCode: 404,
      message: "Dinosaur not found",
    });
  }

  return dinosaur;
});
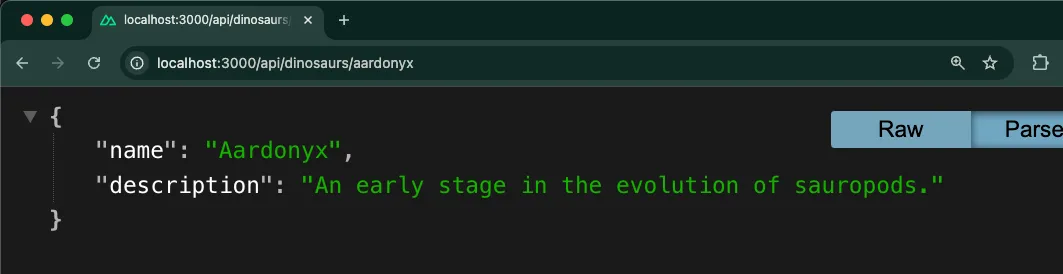
Run the server with deno task dev and visit
http://localhost:3000/api/dinosaurs in
your browser, you should see the raw JSON response showing all of the dinosaurs!
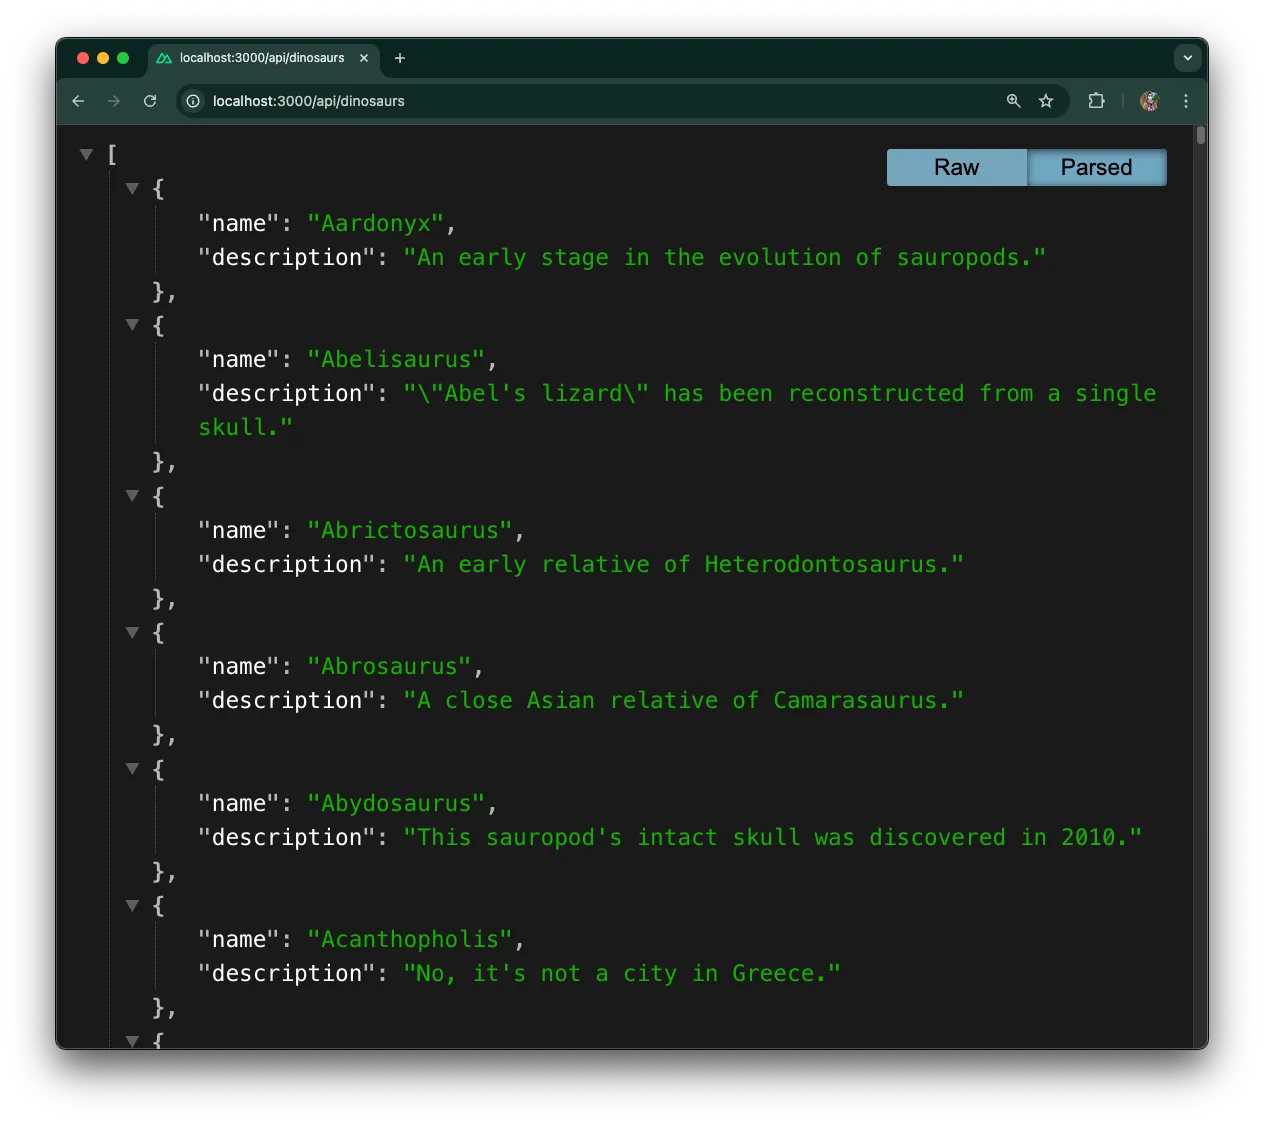
You can also retrieve data for a single dinosaur by visiting a particular dinosaur name, for example: http://localhost:3000/api/dinosaurs/aardonyx.
Next, we'll setup the frontend with Vue to display the index page and each individual dinosaur page.
Setup the Vue frontend Jump to heading
We want to set up two pages within the app:
- An index page which will list all of the dinosaurs
- An individual dinosaur page showing more information about the selected dinosaur.
First, create the index page. Nuxt uses
file-system routing, so we will
create a pages directory in the root, and within that an index page called
index.vue.
To get the data, we’ll use the useFetch composable to hit the API endpoint we
created in the previous section:
<script setup lang="ts">
const { data: dinosaurs } = await useFetch("/api/dinosaurs");
</script>

<template>
  <main>
    <h1 class="text-2xl font-bold mb-4">Welcome to the Dinosaur app</h1>
    <p class="mb-4">Click on a dinosaur below to learn more.</p>
    <ul class="space-y-2">
      <li v-for="dinosaur in dinosaurs" :key="dinosaur.name">
        <NuxtLink
          :to="'/' + dinosaur.name.toLowerCase()"
          class="text-blue-600 hover:text-blue-800 hover:underline"
        >
          {{ dinosaur.name }}
        </NuxtLink>
      </li>
    </ul>
  </main>
</template>
For the page that shows information on each dinosaur, we'll create a new dynamic
page called [name].vue. This page uses Nuxt's
dynamic route parameters,
where the [name] in the filename can be accessed in JavaScript as
route.params.name. We’ll use the useRoute composable to access the route
parameters and useFetch to get the specific dinosaur's data based on the name
parameter:
<script setup lang="ts">
const route = useRoute();
const { data: dinosaur } = await useFetch(
  `/api/dinosaurs/${route.params.name}`
);
</script>

<template>
  <main v-if="dinosaur">
    <h1 class="text-2xl font-bold mb-4">{{ dinosaur.name }}</h1>
    <p class="mb-4">{{ dinosaur.description }}</p>
    <NuxtLink to="/" class="text-blue-600 hover:text-blue-800 hover:underline">
      Back to all dinosaurs
    </NuxtLink>
  </main>
</template>
Next, we’ll have to connect these Vue components together so that they render
properly when we visit the root of the domain. Let’s update app.vue at the
root of the directory to serve our application’s root component. We’ll use
NuxtLayout for consistent
page structure and NuxtPage
for dynamic page rendering:
<template>
  <NuxtLayout>
    <div>
      <nav class="p-4 bg-gray-100">
        <NuxtLink to="/" class="text-blue-600 hover:text-blue-800">
          Dinosaur Encyclopedia
        </NuxtLink>
      </nav>

      <div class="container mx-auto p-4">
        <NuxtPage />
      </div>
    </div>
  </NuxtLayout>
</template>;
Run the server with deno task dev and see how it looks at
http://localhost:3000:
Looks great!
Add Tailwind Jump to heading
Like we said, we're going to add a little bit of styling to this application. First, we'll set up a layout which will provide a consistent structure across all pages using Nuxt's layout system with slot-based content injection:
<template>
  <div>
    <slot />
  </div>
</template>;
In this project, we’re also going to use tailwind for some basic design, so we need to install those dependencies:
deno install -D npm:tailwindcss npm:@tailwindcss/vite
Then, we're going to update the nuxt.config.ts. Import the Tailwind dependency
and configure the Nuxt application for Deno compatibility, We'll enable
development tools, and set up Tailwind CSS:
import tailwindcss from "@tailwindcss/vite";

export default defineNuxtConfig({
  compatibilityDate: "2025-05-15",
  devtools: { enabled: true },
  nitro: {
    preset: "deno",
  },
  app: {
    head: {
      title: "Dinosaur Encyclopedia",
    },
  },
  css: ["~/assets/css/main.css"],
  vite: {
    plugins: [
      tailwindcss(),
    ],
  },
});
Next, create a new css file, assets/css/main.css, and add an import @import
that imports tailwind, as well as the tailwind utilities:
@import "tailwindcss";

@tailwind base;
@tailwind components;
@tailwind utilities;
Running the application Jump to heading
We can then run the application using:
deno task dev
This will start the app at localhost:3000:
And we’re done!
🦕 Next steps for a Nuxt app might be to add authentication using the Nuxt Auth module, implement state management with Pinia, add server-side data persistence with Prisma or MongoDB, and set up automated testing with Vitest. These features would make it production-ready for larger applications.